---
title: "Map Render — Top-Down Orthographic Renders (Premium)"
url: https://dmytrogladkyi.com/GladRoTools/map-render/
date: 2026-05-11
author: Dmytro Gladkyi
tags: ["gladrotools","roblox","macos","premium"]
description: "Generate top-down orthographic PNG map renders of Roblox places through the GladRoTools Studio bridge."
---
**Map Render** generates top-down orthographic PNG images of your Roblox place by instructing the Studio plugin to perform raycasts. The result is a clean, accurate map that you can use for thumbnails, minimaps, marketing, or in-game UI.
---
## How to Use
1. Click **Map Render** in the sidebar (requires [GladRoTools Pro](https://dmytrogladkyi.com/GladRoTools/subscription/)).
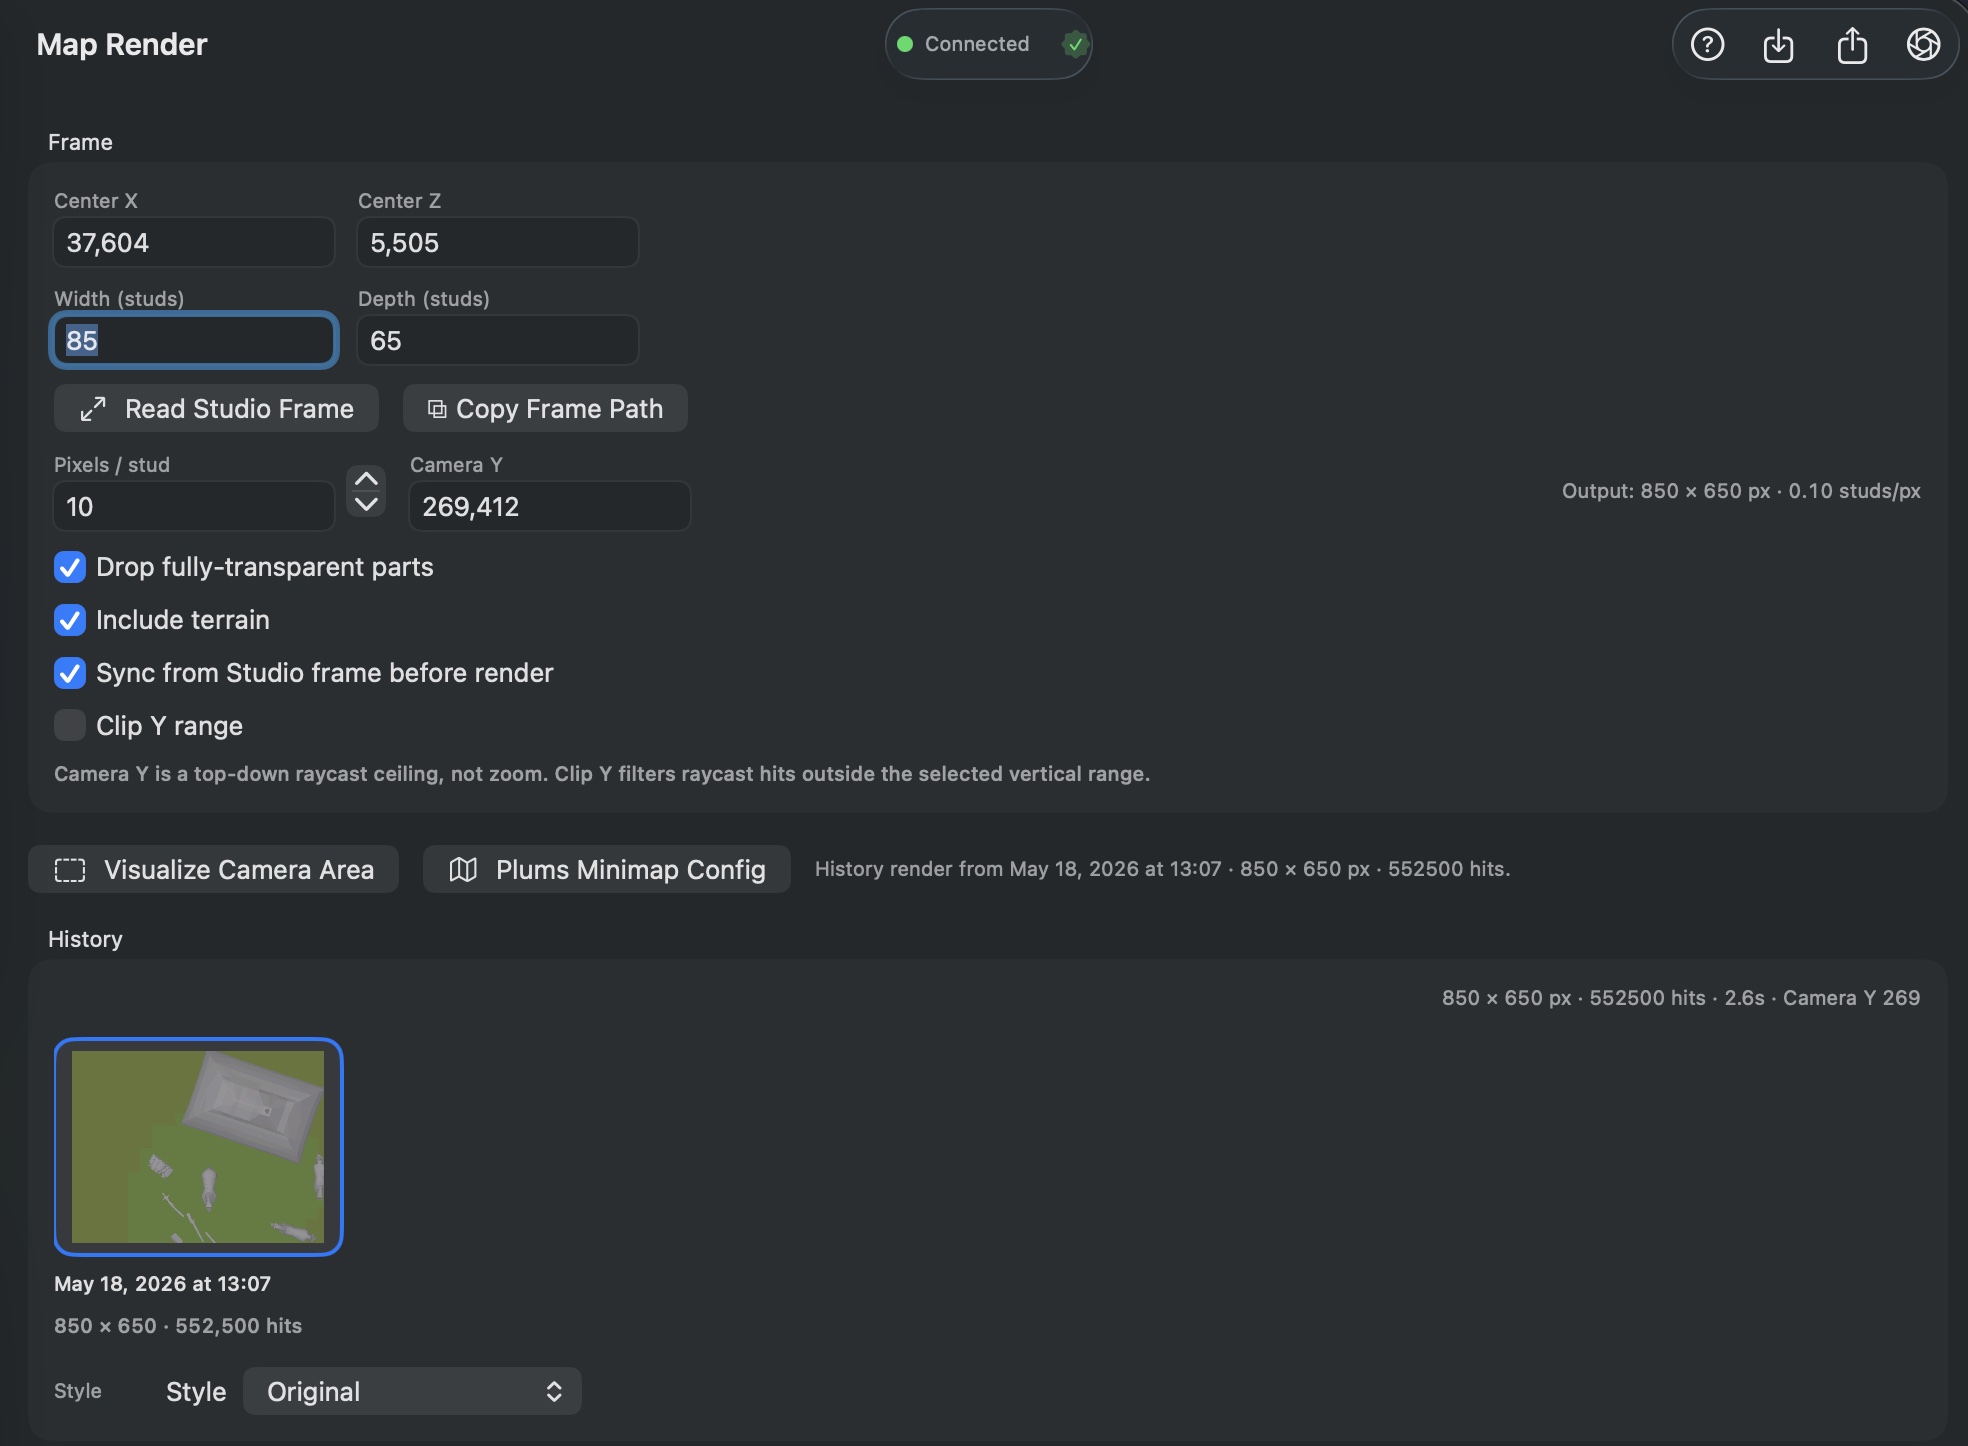
2. Configure the render frame:
- **Center X / Z:** The center of the render area (in studs).
- **Width / Depth:** The size of the area to render.
- **Pixels per Stud:** Resolution control — higher values produce sharper (but larger) images.
- **Camera Y:** Height of the virtual orthographic camera above the map.
3. Options:
- **Drop fully transparent parts:** Exclude invisible geometry.
- **Include terrain:** Render terrain in addition to parts.
- **Sync from Studio:** Pull the frame from workspace bounds before rendering.
- **Clip Y range:** Only render geometry within a vertical band.
4. Click **Render** — progress streams in real time from Studio.
5. Review the result:
- Preview the rendered PNG.
- Save as PNG to disk.
- Upload directly as a decal to Roblox.
### Extras
- **Plums Minimap config:** Generates a Lua configuration snippet for the Plums Minimap plugin.
- **Visualize Camera Area:** Places a temporary frame part in Studio showing the render boundary.
- **Read Studio Frame:** Imports frame position/size from a manual placement in Studio.
- **History:** Past renders saved per-place with thumbnails, metadata, and timestamps.
---
## Help & Tips
- **Resolution math:** The output dimensions in pixels = `width × pixelsPerStud` by `depth × pixelsPerStud`. A 1024×1024 map at 1 pixel/stud produces a 1024×1024 PNG. At 4 pixels/stud it is 4096×4096.
- **Raycast cost:** Rendering sends one raycast per pixel. A 2048×2048 render is 4 million raycasts. Start with lower resolutions and scale up when you are happy with the framing.
- **Create branded thumbnails:** Render a clean top-down map, then overlay it with text in [Image Tools](https://dmytrogladkyi.com/GladRoTools/image-tools/) or an external editor for YouTube thumbnails and game icons.
- **Terrain adds time:** Including terrain significantly increases raycast count. Disable it during test renders.
---
## FAQ
### How long does a render take?
Depends on resolution, part count, and terrain. A 512×512 render of a typical place completes in under 30 seconds. A 4096×4096 render of a dense map can take several minutes.
### Why are some parts missing from the render?
Transparent parts (if **Drop fully transparent parts** is on), parts outside the clip Y range, and parts in `ServerStorage` or `ServerScriptService` are excluded.
### Can I render interiors?
Map Render is top-down orthographic, so it captures rooftops and the highest surfaces. For interiors, try adjusting the **Clip Y range** to bracket the interior height.
### Does this require an internet connection?
No — the render is done entirely locally via Studio raycasts. No asset data is uploaded.
 ---
## How to Use
1. Click **Map Render** in the sidebar (requires [GladRoTools Pro](https://dmytrogladkyi.com/GladRoTools/subscription/)).
2. Configure the render frame:
- **Center X / Z:** The center of the render area (in studs).
- **Width / Depth:** The size of the area to render.
- **Pixels per Stud:** Resolution control — higher values produce sharper (but larger) images.
- **Camera Y:** Height of the virtual orthographic camera above the map.
3. Options:
- **Drop fully transparent parts:** Exclude invisible geometry.
- **Include terrain:** Render terrain in addition to parts.
- **Sync from Studio:** Pull the frame from workspace bounds before rendering.
- **Clip Y range:** Only render geometry within a vertical band.
4. Click **Render** — progress streams in real time from Studio.
5. Review the result:
- Preview the rendered PNG.
- Save as PNG to disk.
- Upload directly as a decal to Roblox.
### Extras
- **Plums Minimap config:** Generates a Lua configuration snippet for the Plums Minimap plugin.
- **Visualize Camera Area:** Places a temporary frame part in Studio showing the render boundary.
- **Read Studio Frame:** Imports frame position/size from a manual placement in Studio.
- **History:** Past renders saved per-place with thumbnails, metadata, and timestamps.
---
## Help & Tips
- **Resolution math:** The output dimensions in pixels = `width × pixelsPerStud` by `depth × pixelsPerStud`. A 1024×1024 map at 1 pixel/stud produces a 1024×1024 PNG. At 4 pixels/stud it is 4096×4096.
- **Raycast cost:** Rendering sends one raycast per pixel. A 2048×2048 render is 4 million raycasts. Start with lower resolutions and scale up when you are happy with the framing.
- **Create branded thumbnails:** Render a clean top-down map, then overlay it with text in [Image Tools](https://dmytrogladkyi.com/GladRoTools/image-tools/) or an external editor for YouTube thumbnails and game icons.
- **Terrain adds time:** Including terrain significantly increases raycast count. Disable it during test renders.
---
## FAQ
### How long does a render take?
Depends on resolution, part count, and terrain. A 512×512 render of a typical place completes in under 30 seconds. A 4096×4096 render of a dense map can take several minutes.
### Why are some parts missing from the render?
Transparent parts (if **Drop fully transparent parts** is on), parts outside the clip Y range, and parts in `ServerStorage` or `ServerScriptService` are excluded.
### Can I render interiors?
Map Render is top-down orthographic, so it captures rooftops and the highest surfaces. For interiors, try adjusting the **Clip Y range** to bracket the interior height.
### Does this require an internet connection?
No — the render is done entirely locally via Studio raycasts. No asset data is uploaded.